Stock Management & Re-Order Process
The Stock Management & Re-Order
Process function allows you to manage your stock levels and re-order
points for all your inventory items. You have the ability to analyze a
sub-set of your inventory at any given time. Select a range of items or
all items. You may further limit the selection by class and sub-class
codes. This allows you to manage your inventory in distinct groups
of similar items. You can elect to have the system calculate your
recommended stock
levels based on historical sales data, thus allowing you to fine tune your economic
order quantities. Once you have established the desired parameters, you can
elect to have the system automatically create purchase orders, to replenish
your stock.
Overall the Stock
Management & Re-Order Process provides a fast and efficient mechanism to
manage all of your stock levels and minimize the cost of carrying your
inventory.
Choose Inventory followed by Stock
Management & Re-Order from the main menu bar.
You
can click on the menu selection or highlight the
selection with the cursor keys, then press the
ENTER key.
The Stock Management & Re-Order form should appear as depicted
in the figure below. This is the main form to process and generate the
data set for analysis and creation into purchase orders.
The exit Icon ![]() ,
clicking it will exit the form.
,
clicking it will exit the form.
The Process Data Icon ![]() ,
clicking it will start the analysis process and gather the data based on
the selection criteria. If there is an existing data set, you will receive
a warning message, There is an existing data set, Over-write this Data?
If you select Yes, the existing data set will be erased and a new data set will be created. The existing data set might have been
left over from a prior analysis.
,
clicking it will start the analysis process and gather the data based on
the selection criteria. If there is an existing data set, you will receive
a warning message, There is an existing data set, Over-write this Data?
If you select Yes, the existing data set will be erased and a new data set will be created. The existing data set might have been
left over from a prior analysis.
The results of the data selection process appear in the lower section of the screen in a Page Frame. There are two views available after you have created the data set, the Stock Analysis and the Auto P.O. views. The Stock Analysis displays the results of the data set created from the selected criteria. You can then export the results to an excel file or view several reports. The Auto P.O. view screen is where you select the vendors to generate the purchase orders from the recommend re-order values. This will be discussed in more detail in the coming sections.
The posting Icon ![]() ,
clicking it takes the existing data sets minimum (Min
Rec.) and maximum (Max
Rec.) recommended values, then updates
the live inventory master file's minimum and maximum fields. It is
strongly recommend that you perform this task after you review the results of
the selected criteria. Once you select to update the data in the inventory
master file, there is no way to revert to its original state. The only
fields that are updated in the inventory master file are the minimum and maximum
on hand values. If you feel you made a mistake, go back to the main Stock
Management & Re-Order screen, select the parameters for a new analysis,
click the Process Data Icon
,
clicking it takes the existing data sets minimum (Min
Rec.) and maximum (Max
Rec.) recommended values, then updates
the live inventory master file's minimum and maximum fields. It is
strongly recommend that you perform this task after you review the results of
the selected criteria. Once you select to update the data in the inventory
master file, there is no way to revert to its original state. The only
fields that are updated in the inventory master file are the minimum and maximum
on hand values. If you feel you made a mistake, go back to the main Stock
Management & Re-Order screen, select the parameters for a new analysis,
click the Process Data Icon ![]() , and
create a new data set. Review the data set, then post it. The min and max
values will be updated. You can use this
tool to set these values without the need to create purchase orders.
, and
create a new data set. Review the data set, then post it. The min and max
values will be updated. You can use this
tool to set these values without the need to create purchase orders.
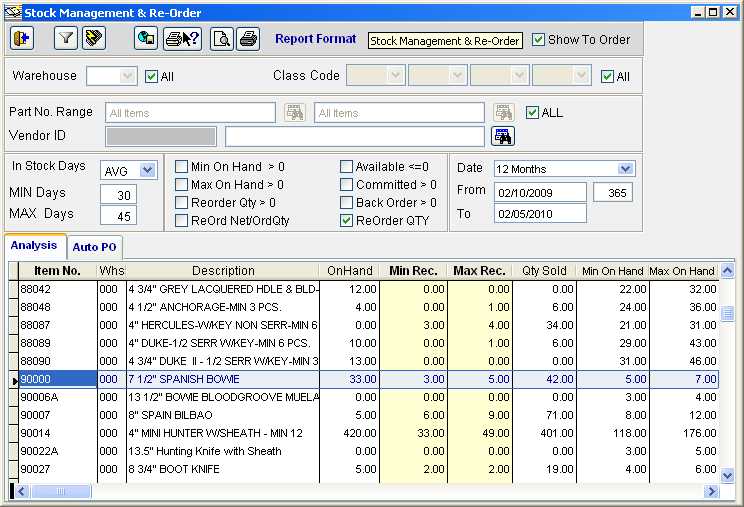
Stock Management & Re-Order - Main Screen and
Analysis Tab (Figure 1.)
Stock Management & Re-Order - Main Screen Field Definitions
Warehouse - WHS - This field indicates the warehouse where the item is located. If you want to analyze inventory for a given warehouse location, uncheck the All check box next to the warehouse field and use the drop-down control to select the warehouse you want to analyze. If you are not concerned with a particular warehouse and want to run the analysis on all warehouses, leave the ALL check box checked.
Class Code & Sub 1-2-3- This field indicates the class code and sub class codes for this item. The class code is the first tier in a four tier classification system. Uncheck the All Classes check box, then select the class and subclass for your analysis.
Part Number - Select one part number or a range of part numbers. If you leave the ALL check box checked, all the items are analyzed.
In Stock Days - This field sets the range for the lower and upper limits of the number of days that you want to have stock for. The value you place in the Min Days is interpreted by the system as the minimum number of days you want to make sure you have stock on hand to sell for a given item. The Max Days, sets the upper limit indicating the maximum number of days you want to have stock on hand to sell for a given item.
![]() - This drop
down control allows the selection of MIN, MAX or AVG. This field is
used in conjunction with the Purchase Order Auto Generation
screen. If you select MIN, the Req. Min. Qty. from the analysis screen
will be used to fill the default QTY Ord in the Purchase
Order Auto Generation screen. If you select MAX, the value
from the Req. Max Qty field will be used and if you select AVG, the average
of the two values will be used. The default is AVG.
- This drop
down control allows the selection of MIN, MAX or AVG. This field is
used in conjunction with the Purchase Order Auto Generation
screen. If you select MIN, the Req. Min. Qty. from the analysis screen
will be used to fill the default QTY Ord in the Purchase
Order Auto Generation screen. If you select MAX, the value
from the Req. Max Qty field will be used and if you select AVG, the average
of the two values will be used. The default is AVG.
Analysis Range - This field indicates to the system the number of months of sales data that will be used to calculate stock levels and re-order points. If you select 6 months, the process will review the last six months of sales data and generate an average monthly usage value. This value is displayed in the analysis view screen and is used to calculate the recommend re-order levels.
Min On Hand > 0 - This field indicates the minimum on hand for the item. The value is taken from the inventory master item display field of the same name. If you check this box, only those items with a minimum on hand greater than zero will be included in the analysis data set.
Max On Hand > 0 - This field indicates the maximum on hand for the item. The value is taken from the inventory master item display field of the same name. If you check this box, only those items with a maximum on hand greater than zero will be included in the analysis data set.
Re-Order Qty > 0 - This field indicates the re-order quantity for the item. The value is taken from the inventory master item display field of the same name. If you check this box, only those items with a Re-Order quantity greater than zero will be included in the analysis data set.
ReOrd Net/OrdQty - If this field is checked, the Re-Order total value is calculated by multiplying the required quantity, which is defined as the On Hand required minimum minus the sum of the current on hand, plus the current on order, minus the committed. If this box is unchecked, then the total cost is calculated on the re-order quantity.
Available - This field indicates the quantity available for the item. The value is taken from the inventory master item display field of the same name. If you check this box, only those items with an available quantity greater than zero will be included in the analysis data set. How available is calculated depends on how the allocation flag in the system maintenance is set. If the committed to ship and SO allocation is set then the available is Quantity on Hand minus the quantity allocated if the flag is not set then the available is Quantity on Hand minus the quantity committed..
Committed or On SLS Order - This field indicates the quantity committed for the item. The value is taken from the inventory master item display field of the same name. If you check this box, only those items with a Committed quantity greater than zero will be included in the analysis data set.
Back Order - This field indicates the quantity of back order for the item. If you check this box, only those items with a Back Order quantity greater than zero will be included in the analysis data set.
Process - Once you
have clicked on the Process Data icon ![]() and the data set has been created, you have several
options to view the newly created data set, Stock Analysis or Auto
PO. The stock analysis view will display the results based on
the selected criteria. The Auto PO view will allow you to generate
purchase orders for the items selected by the analysis.
and the data set has been created, you have several
options to view the newly created data set, Stock Analysis or Auto
PO. The stock analysis view will display the results based on
the selected criteria. The Auto PO view will allow you to generate
purchase orders for the items selected by the analysis.
Its important to note, the values depicted on the analysis
screen are taken form the live inventory data at a particular point in
time. In essence you are looking at a snap-shot of your inventory at the
time you clicked the Process Data icon. If your operations
continue to buy, sell and adjust inventory, the values in the analysis data set will
not change dynamically. The values generated will remain as of the time
you clicked the Process Data icon.
There are three pre-formatted reports that you can view. Use the Printer
Group icons to view or print the reports. Select form the Radio Buttons A,
B or C to view the different formats and data listed on the reports. If
you need additional views you can click the export to excel icon ![]() to generate an excel file.
to generate an excel file.
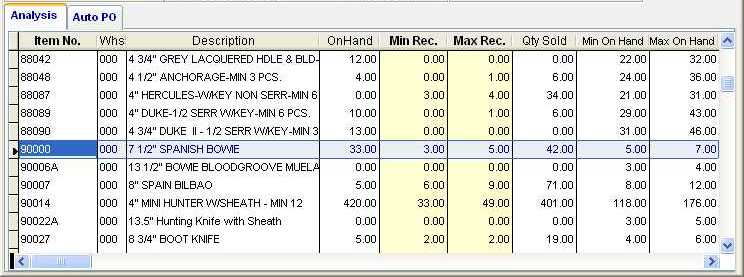
Stock Management &
Re-Order - Analysis Screen Tab Field
Definitions ( from figure 2.)
Item No. - The item number from the inventory master.
Whs - The warehouse where the item is located.
Description - The item description from the inventory master.
On Hand. - The On Hand value at the time the analysis data was created.
Min Rec. - The
minimum recommended stock level for this item based on the criteria
selected. The system calculates this value using the following formula:
(Total QTY Sold over the
Analysis Date Range Divided by Analysis Range in Total
Days) Times (Min Stock Days)
Example: Item
90000 (42 /
365) * 30 = 3.452 rounded to 3
Example: Item 90007 (71 /
365) * 30 = 5.837 rounded to 6
This field can be changed. If you elect to change this field, the
resulting Required Qty will change accordingly. Its important
to note, if the Required Qty value is zero or negative, the
item will not appear in the Purchase Order Auto Generation
screen. If you want to include the item in the re-order process,
change the Min. Rec. value so that the Required Qty
is greater than zero. Be careful when doing this, you might confuse
the system. There might be a legitimate reason to alter this value.
This might be a brand new item or line and you want to manually adjust the
minimum on hand value, which you expect will work best for your
business. As the system builds history on this item, it will begin to
predict and guide you as to the best economic stock levels.
Max Rec. The
maximum recommended stock level for this item based on the criteria
selected. The system calculates this value using the following formula:
(Total QTY Sold over the
Analysis Date Range Divided by Analysis Range Total
Days) Times (Max Stock Days)
Example: Item 90000 (42 / 365) * 45 =
5.178 rounded to 5
Example: Item 90007 (71 /
365) * 45 = 8.753 rounded to 9
This field can be changed.
Qty Sold - The total quantity sold for the select period of either 3, 6 or 12 months. This is based only on posted invoices. Orders ready to ship and un-posted invoices are not included in this calculated value. Make sure all invoices have been posted prior to running the process.
Min on Hand - The current minimum on hand value at the time the analysis data was created. This value is taken from the inventory master file.
Max On hand - The current maximum on hand value at the time the analysis data was created. This value is taken from the inventory master file.

Stock Management &
Re-Order - Analysis Screen Tab (figure 2.).
Stock Management & Re-Order - Analysis Screen Tab (figure 2.) - Field Definitions
Committed - The total quantity committed (open sales orders) at the time the analysis data was created. This value is taken from the inventory master file.
On Order - The total quantity on-order (open purchase orders) at the time the analysis data was created. This value is taken from the inventory master file.
ReOrder Quantity - The total Re-Order value in the inventory master for this item. This value is taken from the inventory master file.
Net Quantity - This
value is calculated at the time the analysis data is created. The formula
used to calculate this value is:
On Hand Plus On Order Minus Committed.
Example: Item 90000 33 + 1 - 34 = 0
Example: Item 90007 5 + 2 - 3 = 4
The fields used in the formula are taken from the inventory master file.
Req. Min Qty - This
value is calculated at the time the analysis data is created. The
fields that are highlighted in light orange, indicate they will be placed on
a PO. The formula
used to calculate this value is:
Min On Hand Minus
(On Hand Plus On Order Minus
Committed)
Example: Item 90000 (5) - (33 + 1 - 34) =
5 You need 5 units
Example: Item 90007 (8) - ( 5 + 2 - 3) =
4 You need 4 units.
The fields used in the formula are taken from the inventory master
file. If MIN is selected as the Stock Days, this field will be used as the default QTY Ord
amount on the Auto Purchase Order screen. You can affect the value of this
field by changing the Min. Rec. value. If AVG is selected as
the Stock Days, then the average of Req. Min and Max will be used as the
default QTY Ord amount on the Auto Purchase Order screen.
Req. Max Qty - This
value is calculated at the time the analysis data is created. The formula
used to calculate this value is:
Max On Hand Minus
(On Hand Plus On Order Minus
Committed)
Example: Item 90000 (7) - (33 + 1 - 34) =
7 You need 7 units
Example: Item 90007 (12) - (5 + 2 - 3) =
8 You need 8 units.
The fields used in the formula are taken from the inventory master
file. If MAX is selected as the Stock Days, this field will be used as the default QTY Ord
amount on the Auto Purchase Order screen. You can affect the value of this
field by changing the Max. Rec. value. If AVG is
selected as the Stock Days, then the average of Req. Min and Max will be
used as the default QTY Ord amount on the Auto Purchase Order
screen.
The figure below is the Purchase Order Auto Generation
screen displaying the data set with the items to be converted into a purchase
order. Items that did not have a quantity greater than zero in the Required
Quantity field on the analysis screen, will not show up here. Your
are given a chance to over-ride this value by changing the Min. Rec.
value in the analysis screen. If you do not see an item here that
was included in the analysis screen, exit this screen and go back to the
analysis screen. make the changes to the Min. Rec. values until
you have a value greater than zero for the Required Quantity, then
you can return to process the purchase orders.
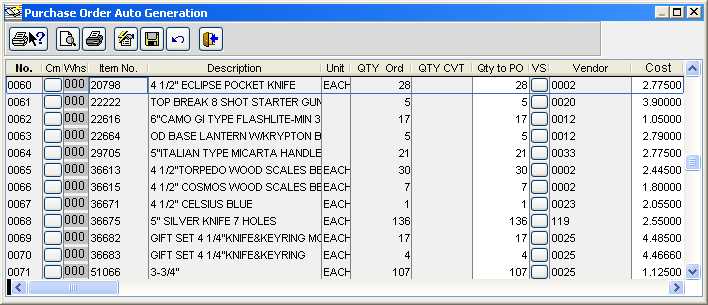
Purchase Order Auto
Generation - Screen.
Purchase Order Auto Generation - Screen Field Definitions
No - The item count, a sequential number generated by the system.
Item No. - The item number from the inventory master file.
Whs - The warehouse where the item is located.
Description - The item description from the inventory master file.
Unit - The unit of measure description taken from the inventory master file.
Qty Ord - The recommended quantity to order for this item. This is the Required Qty displayed on the Analysis View screen. You are allowed to over-ride this quantity. See the prior section on the Required Qty on how to change this value.
Qty CVT The quantity that has already been converted into a purchase order for this data set. Using the same data set you can create several sets of purchase orders.
Qty To PO - The quantity that will be placed into the purchase order. The default is the Required Qty displayed on the Analysis View screen. You are allowed to over-ride this quantity. As previously mentioned you can return to the Analysis View screen to affect the value of this quantity or change it right on this screen. The benefit of changing it at the Analysis screen, is that you can later update the Min. Rec. quantity in your master inventory file.
VS - Click this button to select a vendor to assign to this item. The vendor assigned is the vendor the purchase order will be generated for. The system will group like vendor together and generate one purchase order for all the items associated with the vendor.
Vendor - The Vendor code that the purchase order will be generated for this item.
Cost - The cost to be entered on the purchase order.
To start the Purchase Order
Auto Generation process click the transaction icon ![]() .
A message will display asking, Transfer all Quantities to Purchase Order?
If you click Yes, all the values in the QTY Ord field will be
copied into the Qty to PO field. If you checked the ReOrder
QTY box, then the values from the Re-Order Quantity field in the master
inventory record will be placed into the Qty to PO field.
If you are going to convert
most of the items, its best to select this option and avoid having to manually
enter the values one by one. Then you can select those items you will not create a
purchase order for and insert a value of zero. If you answer No, you will
have to manually enter the values into the Qty to PO field.
If you enter a quantity of zero for any Qty to PO field, that item
will not be passed to the purchase order, it will be ignored.
.
A message will display asking, Transfer all Quantities to Purchase Order?
If you click Yes, all the values in the QTY Ord field will be
copied into the Qty to PO field. If you checked the ReOrder
QTY box, then the values from the Re-Order Quantity field in the master
inventory record will be placed into the Qty to PO field.
If you are going to convert
most of the items, its best to select this option and avoid having to manually
enter the values one by one. Then you can select those items you will not create a
purchase order for and insert a value of zero. If you answer No, you will
have to manually enter the values into the Qty to PO field.
If you enter a quantity of zero for any Qty to PO field, that item
will not be passed to the purchase order, it will be ignored.
Next, select the vendor to generate the purchase order for. If there is a vendor already displayed, it was taken from the default vendor in the inventory master file. You can select a different vendor by entering the vendor code under the Vendor column or by clicking the button under the VS column, the vendor selection screen will pop-up. If you leave a vendor code empty, that item will not be passed to the purchase order even though it might have a Qty to PO value greater than zero.
Once you have the Qty
to PO values entered, selected a vendor and reviewed your
entries, click the save Icon ![]() .
This will begin the process of creating the purchase orders. Upon
completion, a message will display with a list of the purchase order numbers
generated.
.
This will begin the process of creating the purchase orders. Upon
completion, a message will display with a list of the purchase order numbers
generated.
If you want to start over again,
click the Revert icon, this will fill all the Qty to
PO fields with zero. If you click the exit Icon ![]() at this juncture, you will exit without any changes being made or purchase
orders being created.
at this juncture, you will exit without any changes being made or purchase
orders being created.
Click the exit Icon ![]() to exit the form and not save any changes. You will be returned to the
main process screen..
to exit the form and not save any changes. You will be returned to the
main process screen..